How to select, remove, replace, and eliminate thru-hulls and seacocks - Part 3
What a relief! Over the past several weeks, we’ve completed replacing all the thru-hulls, seacocks, backing blocks, hoses, and even the wire bonding system on our sailboat Koinonia. Our boat had a lot of thru-hulls, so this was a big job, costing over $3000 US in parts and materials, not counting time and labor. Having this project behind us feels like a huge accomplishment, not to mention an important safety and peace of mind investment as we look forward to cruising life, largely free of concern over the integrity of our thru-hull system.
In this week’s post, I’m going to take you through the six steps for how to properly install new thru-hulls, seacocks, and hoses. We‘ll share the tips and tricks we‘ve learned by completing this major refit project on our boat and, hopefully, the lessons learned will help other sailors who need to tackle this job on their boat.
For the sake of this post, we’re going to assume a total replacement of all the components making up the thru-hull installations below the waterline, including: thru-hull, seacock, hose barb fitting, backing block, and reinforced hose with stainless hose clamps. This may not be required in your case. Assuming you have inspected the system as described in parts 1 and 2 of this blog post series, you may only need to replace some of these components. In case you missed the previous posts, you can read about how to select thru-hulls and seacocks in part 1 and how to remove them in part 2.

Step 1: Prep and Clean
The first step is to make sure that both sides of the mechanically drilled hole in the hull have been sanded to bare fiberglass and properly cleaned and dewaxed. This includes the surface of the inside of the hole. The entire area must be free of bottom and bilge paint as well as any caulk from the previous installation. The surface should be made as smooth and level as possible. When you install the new thru-hull with the caulk or marine sealant of your choice (see part 1 for sealant recommendations), you want the caulk to have a clean bonding surface and form a watertight gasket of uniform thickness. After sanding, we recommend using a dry rag to clear away most of the dust, then a rag soaked in acetone to clean any oils and debris, then finally a fiberglass dewaxer and surface prep to ensure a totally clean surface. One way to tell if there is any wax residue is to use a spray bottle filled with water. If the water beads up like a freshly waxed hull, you know waxy residue remains on the surface and further cleaning is needed.
Step 2: Dry Fit All Components
It is very important to make sure the new thru-hull will fit the machined hole diameter and that the thread depth is correct. To determine both, you need to dry fit the backing block and seacock; this is a two-person job. Start by placing the backing block and seacock in position. With these parts held firmly against the inboard side of the hull, use a tape measure to check the total depth from the outboard side of the hull. Measure from the surface of the hull to the bottom of the seacock threads. Now, subtract 1/4 inch. This is the ideal length of the threaded thru-hull pipe body. Make sure you order a thru-hull that is AT LEAST this long.
If you already purchased a thru-hull without measuring, shame on you! Just kidding. If the thru hull threaded body is shorter than the target length, you will need to purchase an extra-long version of the thru-hull for a proper installation. Don’t skimp on this! Conversely, if the thru-hull is too long, you will need to cut the threaded body to the proper length. This is easily done using either a hacksaw or an angle grinder with a cutting wheel. This is definitely an occasion for measuring twice to cut once! Once you are sure the thread body length is correct, dry fit the thru-hull into the seacock to verify. If you cut the thru-hull to length, be sure the threads are very smooth. A wire brush fitting on a drill will do the job perfectly.
At this point, with the backing block, seacock, and thru-hull all in place (dry fit only), make sure the fasteners for the seacock are lined up on the backing block. Now, trace the outside of the backing block on the inside of the hull with a pencil. This is where you want to position the backing block when you bond it to the inboard side of the hull.

Step 3: Install the Seacock Backing Block
There are a number of options for backing block materials. Some people simply use marine plywood, others cut backing blocks out of G10 fiberglass board, some people make them at home by laying up the desired thickness of epoxy and fiberglass, while others prefer to buy them ready-made. All of these options are viable. The typical thickness of a backing block is at least 1/2 inch but they can be thicker. The main purpose of the backing block is to provide a way to fasten the seacock to prevent it from turning. That is really it. Composite backing blocks are usually preferred over natural materials like marine plywood because, eventually, the wood will absorb moisture, swell, and break down. On Koinonia, we used a combination of our own custom made fiberglass backing blocks and Groco backing blocks. The Groco backing blocks are pricey at nearly $40 a pop as of the writing of this post, but when paired with Groco seacocks, the installation couldn’t be easier. Just be sure to follow the instructions provided.
For bonding the backing block to the hull, we recommend a permanent installation using slow set epoxy thickened with colloidal silica. Be sure to mount in the exact location you traced out when you dry fit the part. While epoxy is probably overkill, it is permanent, water tight, low odor, and easy to work with. We’ve seen others recommend the use of Bondo “Kitty Hair” (yes, that’s really what the product is called), but it is very messy, difficult to work with, the surface will not be as smooth, and the chemical odor is extremely bad.
Now, coat the back side of the backing block liberally with the thickened epoxy mixture, taking care to avoid getting the epoxy into the threads where you will install the fasteners to secure the seacock. You need to make sure the threaded holes for the backing block are oriented so that when the seacock is installed, the drain ports on the body of the seacock are oriented downhill. This is so you can drain the residual water from the hose if you need to winterize. Also, you want to make sure the ball valve handle is easy to access and can turn free of any obstacles. Once you are certain of the orientation of the mounting holes, fit the backing block to the hull. You don’t need to force it down squeezing all the epoxy out, you just need to ensure it makes good contact. If you do manage to get some epoxy squeezing up into the holes for fastening the seacock in place, the best solution is to take a fastener and thread it into the hole to clear it out before the epoxy sets up. Remember: we said to use slow-set epoxy! You can clean the expoxy off of the fastener with either vinegar or acetone.
To ensure the backing block does not move from the desired position, use two long strips of masking tape running perpendicular to each other to hold the backing block in position until the epoxy is set. Allow 24 hours before proceeding.

Step 4: Install the seacock to the backing block
At this point, things begin to progress more quickly. Apply sealant liberally to the base of the seacock, avoiding the threads. Gently position the seacock onto the backing block and tighten fasteners/bolts. From the outboard side, clean any excess caulk/sealant from the seacock threads using acetone. Before the sealant sets up, check the thru-hull fit again. Do NOT force it. If you cross thread, you will risk permanent damage to the seacock, thru-hull, or both. Once you’re certain the thru-hull threads easily, proceed immediately to step 5.

Step 5: Install the thru-hull
Take the thru-hull and liberally apply caulk/sealant to the mushroom head base, as well as the first 1/2 inch of the threads closest to the base of the thru-hull. Using your hands, start threading thru-hull into the seacock. Once started, insert a step wrench and tighten the thru-hull down hand tight, plus another 10-20lbs. It doesn’t need to be torqued down any tighter than this. Now clean any excess caulk that squeezed out from around the mushroom head of the thru-hull with a cloth soaked in acetone. Using a dry cloth, make a clean fillet of caulk around the outside edge of the mushroom head so the edge is tapered to the hull (optional).

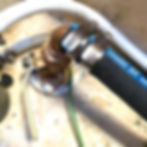
Step 6: Install barbed hose fitting and hose
You’re nearly done! Now you need to install the pipe fitting to the top of the seacock. Wrap teflon thread tape around the threads of the barbed hose fitting. Wrap the tape in the opposite direction you will turn the fitting, usually counterclockwise. Now install the fitting until it is very tight, but not bottomed out. Now, use a reinforced hose, like Trident Flex 250/100 and double stainless hose clamps. The clamps should be installed so that each clamp is tightened from the opposite direction. Make sure both clamps are positioned so the band is entirely over the metal hose fitting and not hanging off the edge, which can damage the hose. If this is not possible, a single well positioned clamp is better than two poorly positioned. If you have trouble getting the hose to seat all the way down onto the barbed hose fitting, you can either heat the hose in warm water to make it more pliable (use gloves) or use Vaseline or clear silicone. The latter approach gets the job done 90% of the time.
The last step is bonding the thru-hulls daisy chain style to one another. This is a somewhat controversial topic, which is why we are not covering extensively in this post. Since the ABYC standard is to bond, we recommend it. Be sure to use at least 8 AWG tinned marine bonding wire with a green colored jacket, per the standard. Wires should terminate to a sacrificial zinc anode through bolted and mounted below the waterline outboard.
That’s it! The process probably sounds more complicated on paper than it is. We recommend planning on 2-3 days from start to finish, allowing time for epoxy and caulk to set up properly. In our next post, we’ll share how to eliminate a thru-hull, making the machined hole in your boat literally vanish!
Let us know if you have any additional tips or feedback by commenting below — we’d love to hear from you! If you found these instructions helpful, please give this post a like and share with your boating buddies.
Fair winds and blessings,
Ben Ward